Give It All Away
/Chaturanga
/- Generate the pose from strength in the legs. Keep those quads engaged!
- In the pose, elbows are over the wrists. Hands press down, low belly lifts.
- Before you bend, be sure to shift forward. Reach with your heart and your heels.
- Draw your shoulder blades together strongly, picturing your heart opening.
- Gaze slightly forward, not up, in order to avoid tension in the neck.
- Think about avoiding these common issues: bum is too high (engage the core more firmly) or shoulders are drooping (again, think of your shoulder blades drawing back).
Free Shipping All Summer at Sweaty Betty
/Returning to the Practice
/Partner Yoga
/The Most Common Fitness Injuries
/If you exercise regularly, you also have the unfortunate side effect of the risk of injury. Knowing what injuries to expect can help you reduce your chances for getting injured while exercising to improve your health. The following injuries are common to athletes and exercise enthusiasts.
Back pain is a common injury during exercise. It is caused by a variety of things. Poor posture during daily life, poor form during exercise, and doing a lot of exercises that arch or strain the back, such as the cycling position, can all strain the back. Back pain can range from slightly annoying to incredibly painful.
You can avoid back pain using several different methods. Try keeping good posture as much as possible during the day. Avoid slouching while sitting or standing. Try core-strengthening exercises to make it easier to have good posture. Try these exercises to increase your core strength:
- Abdominal planks
- Push ups
- Hip bridge
Shin splints are still a mystery in the medical community. No one can agree on what exactly causes the pain. However, for individual who have been active for fewer than 5 years, their chances of getting shin splints are higher. Shin splints typically show up after a sudden increase in training.
The best way to prevent shin splints is to gradually increase training over time, such as no more than 10 percent per week. Stretching the calf muscles and targeting strength training on the calves can also help reduce the chances of shin splints.
Muscle sprains are one of the most common injuries in fitness and sports. The reason is due to a lack of muscle strength and improper exercise form in the majority of cases. Commonly sprained areas include hamstrings, ankles, groin muscles, ACL, and the rotator cuff.
You can prevent these injuries by keeping proper form during exercise and by strengthening the surrounding muscles. There are several exercises that can help reduce the chances of muscle sprains, including:
- Standing deadlifts
- Hamstring curls
- Balance board exercises
- Front leg raises
- Core strength exercises
The American Association of Neurological Surgeons estimates that there are nearly 4 million concussions each year related to sports and exercise activities. Helmets can help protect the skull from some concussions, but because many concussions occur due to high speeds, more injuries are caused by the brain hitting the skull from the inside, which cannot be helped with helmets or exterior protection.
You can help reduce your chances of getting a concussion my wearing headgear if at all possible, and avoiding hitting your head against other people, objects, or helmets. If you do get a head injury, rest and watch for signs of a concussion after, such as headaches, irritability, clouded thinking, and vomiting.
Broken teeth are common in many different sports from hockey to football. Broken teeth typically happen when something flies at the face and hits the player in the mouth. The best way to avoid broken teeth is to wear a helmet with a mouth guard, or wear a bite guard. Most professional athletes wear a combination of both, when possible. Protecting your teeth with a bite guard will help reduce your chances of seeing broken teeth and avoid expensive cosmetic dentist bills.
About the author: Samantha is a freelance writer, a part-time blogger and a health expert.
Insanely Cool Yoga Video
/Yoga for Back Pain Relief
/Photo via Urban Yoga Girl.
Do you suffer from back pain?
Yoga can help.
Today I bring you a handy infographic from
on smart steps for healing as well as yoga postures that relieve back and spine issues.
Why We Breathe: A Yoga Documentary
/I recently learned about an inspiring yoga documentary called Why We Breathe on Hearts Expanding, a yoga blog I love and follow regularly.
The film features the question: why do you do yoga? The filmmakers interviewed a variety of well-known, experienced yogis and teachers to learn why they practice, what keeps them going, and why they love yoga.
The documentary features contributions from Dice Iida-Klein, Briohny Smyth, Kathryn Budig, Tiffany Cruikshank, John Yax, Chris Yax, and Angela Tara Hsu.
You can find out more about the project on their website or on their Facebook page.
Have you seen any other cool yoga films lately?
I Could Hug You All Day
/Color Me Rad Sacramento 5K
/A California Adventure
/Gone Campin'
/I'll be taking a little blogging break while I'm off the grid.
The Path Before You Is Clear
/To me, the mantra means this path is clear; I am free to walk it.
Super Bendy Backbends
/Check Out Who's On Elephant Journal
/Last summer, I had the pleasure of doing a yoga photo shoot in Boston with the talented Cara Brostrom.
I was thrilled to find out her love letter to Boston, a series of words and photographs dedicated to the city, was just featured on Elephant Journal.
And, if you take a look, my yoga postures show up twice in the article. I am so honored to be a part of the piece! I hope you guys check it out.
Cara, your compassion really shines through in the post. Thank you for sharing your love for Boston and for so graciously telling a beautiful story of the city.
For more info on Cara or to book a yoga session with her, see her website.
Namaste.
Working on Headstand and Forearm Balance
/It's been a while since I regularly practiced headstand and forearm balance and I have to say, I greatly miss Dharma Yoga Evanston, where those two postures were a constant part of class!
Fortunately, though, I have the learned the foundational information needed to get in and out of the postures safely on my own, and I am adding them back into my routine.
Today I wanted to share a little advice for those of you practicing these postures, or thinking about learning them.
Tip #1:
In the beginning, practice with a teacher.
It's very important to learn the right way when it comes to inversions, so that you're safe and so you set up good habits. You want to be sure to avoid shoulder and neck strain. Listen carefully and watch your teacher, thinking to yourself, "That is me." Envision yourself in the pose before you are even in it.
Tip #2: Learn how to fall.
The scariest part about inversions is the thought of falling on your head, right? Well, you take that fear away if you practice what it feels like to fall. Remember to tuck your head (chin to chest) and you will protect your neck and spine. Again, this is a great thing to do early on with an instructor present. Once you've pushed through the point of balancing in the pose several times, forcing yourself to fall, you begin to learn where your edge is.
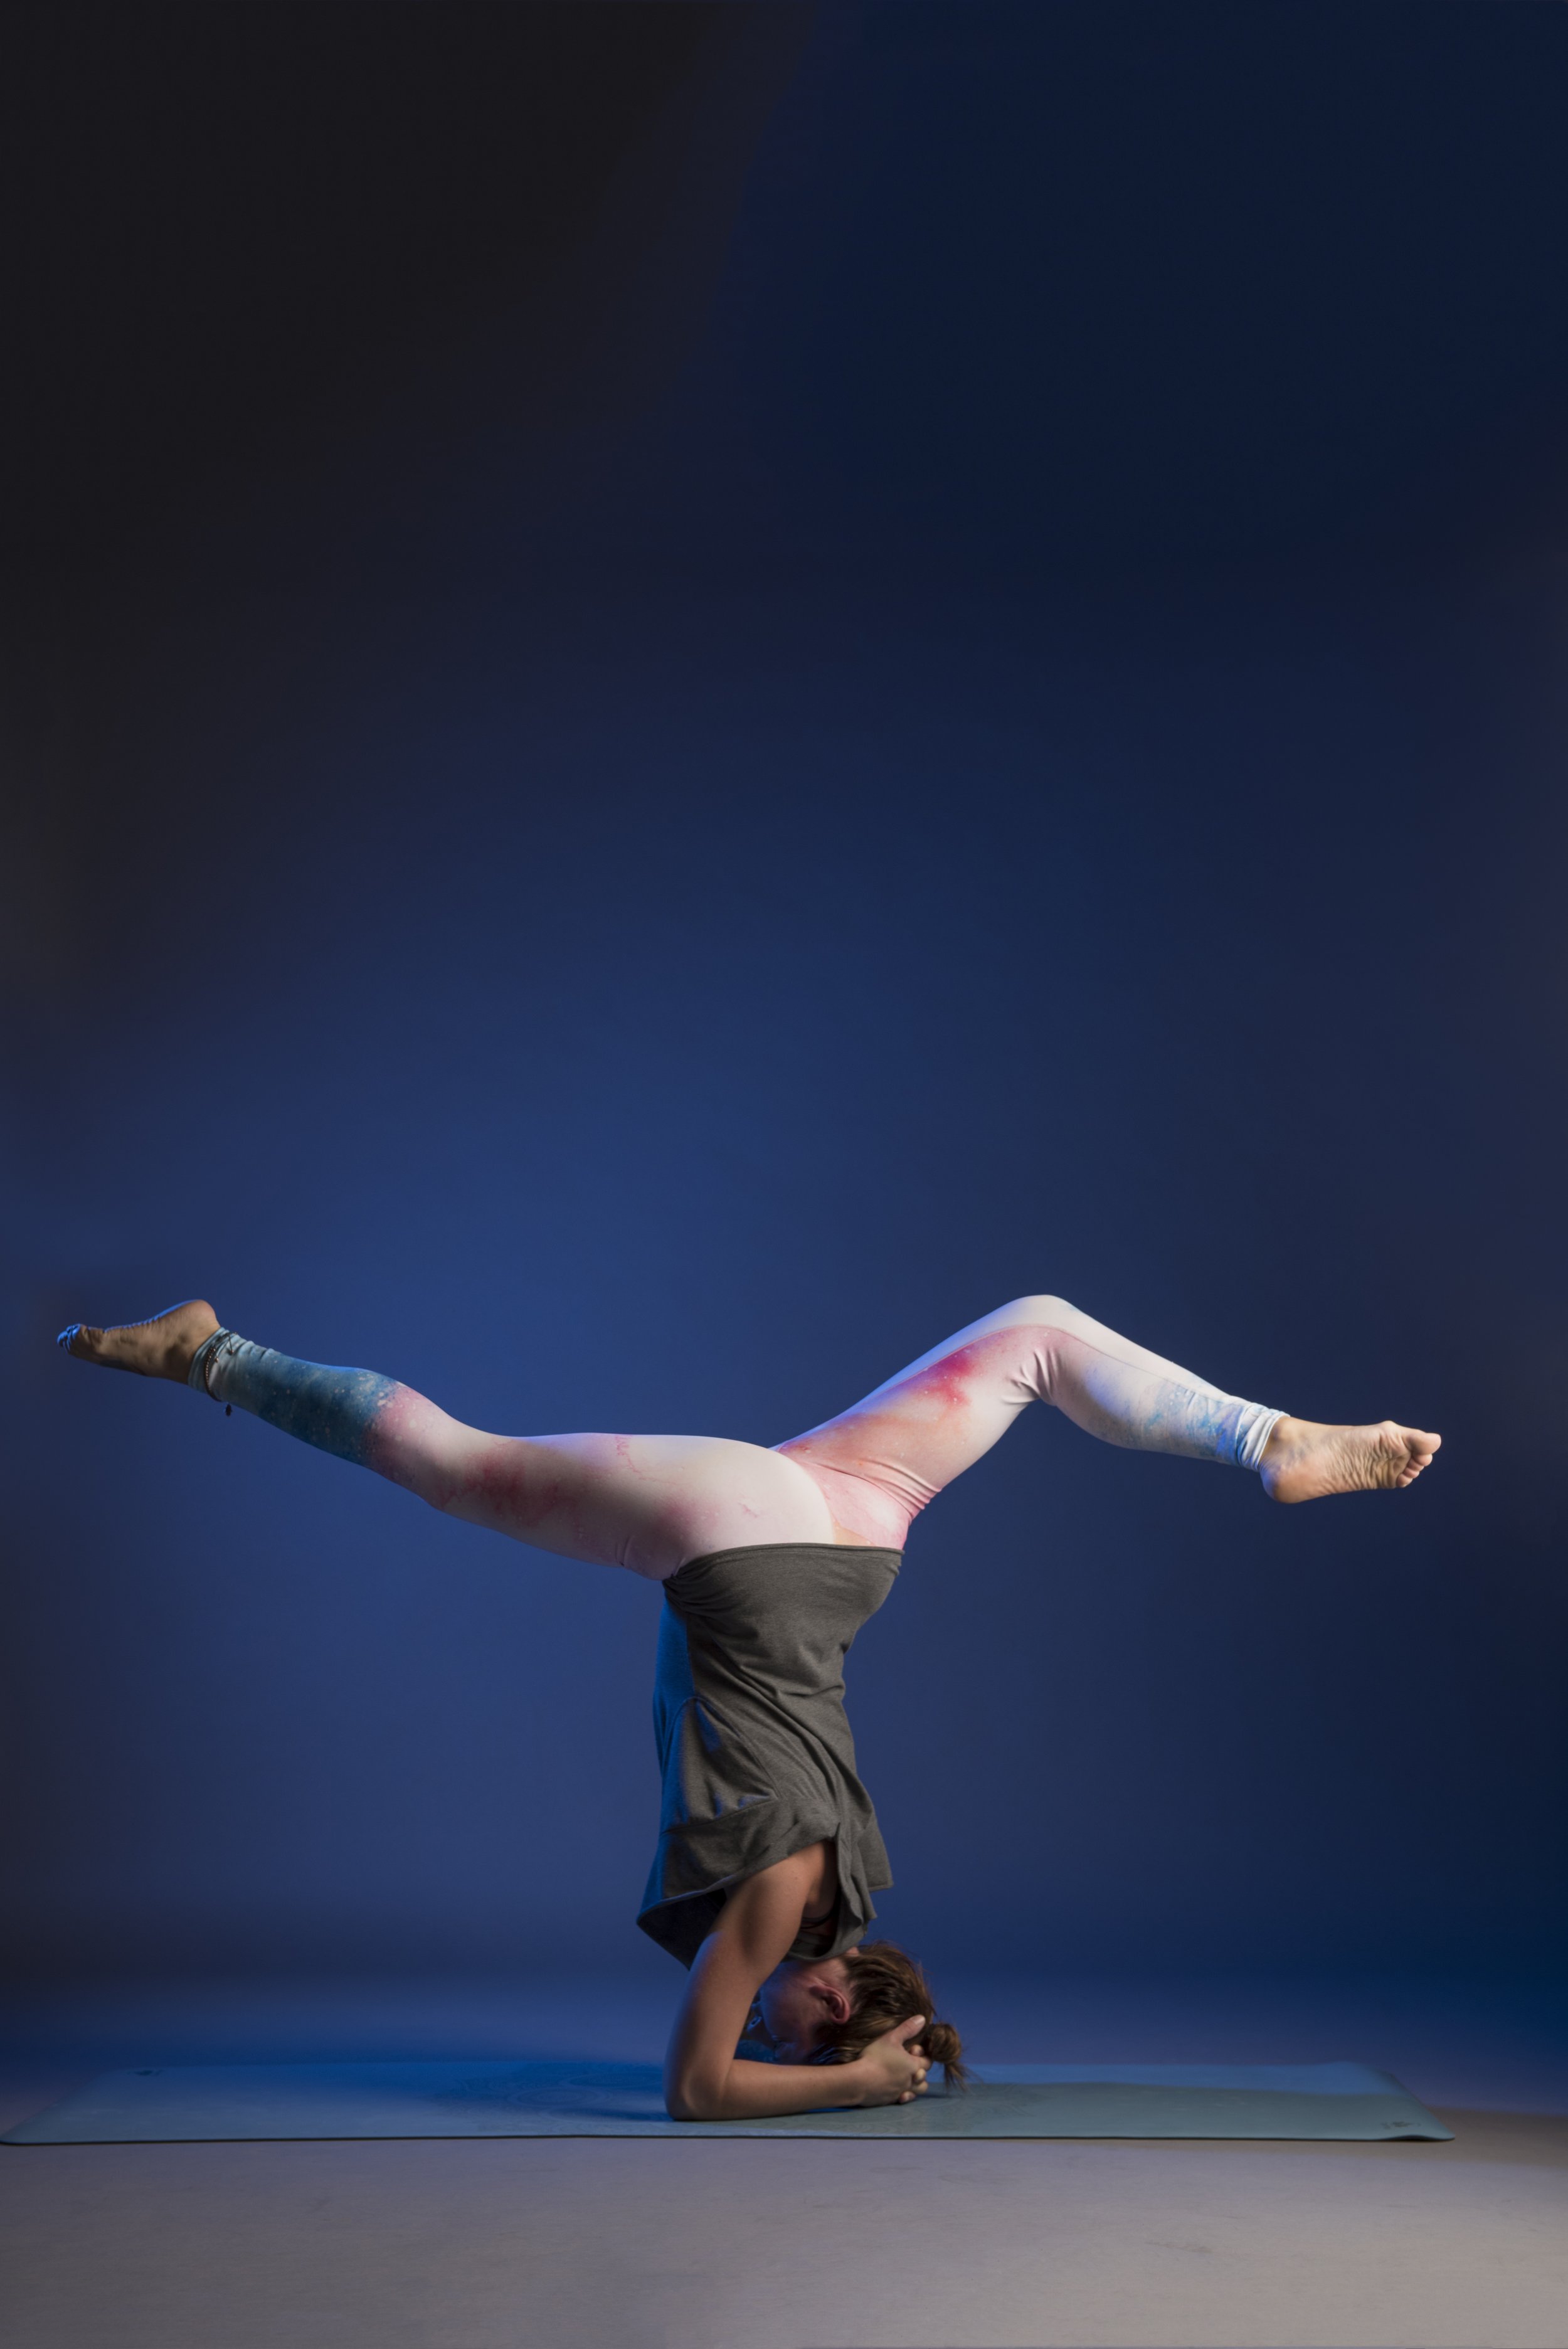
Tip #3: Use the wall conscientiously.
When I first learned headstand, I practiced it a lot at home in front of the wall. Then, when I tried it in class, I immediately felt myself tipping forward, to that place where the wall used to be. For a brief moment I had no idea how to stop myself from falling -- so I did. I hadn't yet learned the way you must fire up all of your back muscles and glutes in order to prevent yourself from tipping forward.
While I think utilizing a wall to learn headstand and forearm balance early on is great, it's also important not to let it become a crutch. As soon as you feel remotely comfortable with the pose, move away from the wall. Challenge yourself to trust your body. And if you're in a class with a bunch of other yogis, allow the energy in the room to inspire you.
Photo via
.
Tip #4: Practice awareness of your mind as you try these poses.
Inversions tend to ignite fear in us.
Eventually you will need to use your own resolve to face the fear, and to ignore the flight-or-fight response your nervous system may produce.
As long as you take the right steps to learn the right way into and out of the posture, know that you are safe. Trust in what your teacher has shown you, and trust that your body is capable of incredible things. Learn to let go of your resistance to the postures themselves.
You know you are moving in the right direction when you don't feel your heart drop at the mention of the pose in class. Instead of slowly making your way into the pose, you set a positive example for your fellow yogis, and you launch happily into trying. As long as you are trying, you are achieving what the pose is meant to do.
Tip #5: Learn to play.
These two postures, Sirsasana and Pinchamayurasana, are poses that can take months or even years to realize. Instead of focusing on a specific outcome of your efforts, embrace where you are in that process right here, today.
Are you simply building strength in your shoulders? Are you experimenting with how much effort it takes to kick your legs up the wall? Are you observing the other yogis in class, noting something new about the pose that you've never seen before?
Wherever you are, you are perfect. You are right where you're meant to be.
5 Ways to Build Confidence for Headstand and Forearm Stand
Headstand (Sirsasana) and Forearm Stand (Pincha Mayurasana) can feel intimidating at first, but with the right approach, they become empowering and joyful. Here are five ways to build strength, stability, and confidence for these inversions:
1. Strengthen Your Foundation
The key to inversions is a strong and stable foundation. Focus on building strength in your shoulders, arms, and core to support your weight.
For Headstand: Practice Dolphin Pose and Forearm Plank to strengthen your shoulders and arms.
For Forearm Stand: Add Push-Ups and Shoulder Taps to your routine to build stability.
Tip: Revisit these foundational poses consistently—they’re the building blocks of your practice.
2. Use the Wall
Practicing with a wall is a game-changer when working toward inversions. The wall provides a safety net while you refine your alignment and balance.
For Headstand: Start by lifting your legs one at a time and resting your feet on the wall for support.
For Forearm Stand: Kick up gently and let the wall catch your feet, giving you time to engage your core and shoulders.
Tip: As you gain confidence, work on pulling your feet slightly away from the wall for short holds.
3. Practice Core-Strengthening Poses
A strong core is essential for controlling your entry into inversions and holding them steady.
Plank Variations: Forearm Plank and Side Plank help build deep core strength.
Boat Pose: Strengthens the lower and upper core muscles.
Leg Lifts: Improves the control needed to lift your legs into inversions without kicking.
Tip: Consistent core work will help you feel more stable and in control when upside down.
4. Learn to Fall Safely
Fear of falling is one of the biggest barriers to inversions. By learning how to fall safely, you’ll eliminate this fear and approach the poses with more confidence.
For Headstand: Practice tucking your chin and rolling forward gently if you lose balance.
For Forearm Stand: Use a wall or soft surface to practice controlled dismounts.
Tip: Falling is part of the process. Treat it as a learning experience rather than a setback.
5. Focus on Your Breath and Mindset
Confidence in inversions isn’t just about physical strength—it’s also about staying calm and focused.
Use Breathwork: Steady, deep breathing keeps you grounded and helps you stay present.
Set an Intention: Approach your practice with curiosity and playfulness instead of self-criticism.
Visualize Success: Picture yourself holding the pose with ease and balance.
Tip: Remember, progress takes time. Celebrate small victories along the way.
The Journey to Confidence
Building confidence for Headstand and Forearm Stand is about consistent practice, patience, and trust in your body. With these five steps, you’ll create a strong foundation and a fearless mindset that makes inversions feel achievable and exciting.
So, roll out your mat, breathe deeply, and enjoy the process—you’ve got this! ✨🧘♀️
Yoga is Simple (A Video Post)
/The small steps used to readjust alignment in Downward Dog.
Stories from the trail. My journey to becoming an ultra marathon runner.